
How to Set Up Septic Tank: A Step-by-Step Guide
Are you moving to a rural area where city sewers don't reach? Or perhaps your old septic system has finally given out? Don't worry! Learning how to set up septic tank systems isn't as scary as it might seem.
We understand that septic tank installation can feel overwhelming. After all, it's a big job that happens underground and deals with your home's waste! But with the right guidance, you can understand the process and work better with professionals.
This septic tank installation guide will walk you through every step, from planning to final inspection. Let's turn this challenging project into a manageable one!
What You Need to Know Before Starting
Before you dig that first shovelful of dirt, there are some important things to consider:
Septic systems require permits in most areas
The average cost ranges from $3,000 to $9,000 according to HomeAdvisor
Installation usually takes 2-5 days with proper equipment
Most homeowners will need professional help for this project
Have you checked if your property is suitable for a septic system? This is your first crucial step!
Getting Started: Planning and Permits
Planning properly saves time, money, and headaches later. Follow these steps:
Contact your local health department Get information about required permits and local regulations. The EPA notes that requirements vary significantly by location.
Schedule a soil test Hire a soil engineer to perform a percolation test. This measures how quickly water moves through your soil.
Choose the right septic system type Based on your soil test, property size, and household needs, pick from:
-Conventional systems (most common)
-Chamber systems
-Drip distribution systems
-Aerobic treatment units
-Mound systems
Create a detailed site plan Map out where the tank and drainfield will go, keeping them away from wells, trees, and structures.
Apply for permits Submit your plans to local authorities. According to the National Environmental Services Center, you'll need approval before starting any work.
Materials and Equipment You'll Need
The right tools make any job easier! Here's what is needed for a basic septic installation:
Septic tank (concrete, plastic, or fiberglass)
Pipes (PVC, schedule 40)
Gravel or crushed stone (clean, 1/2 to 2 1/2 inches)
Filter fabric
Backhoe or excavator
Transit level or laser level
Distribution box
Risers and lids
Septic tank connectors
Safety equipment (gloves, boots, eye protection)
Always check with your supplier about the best materials for your specific area and soil conditions.
Step-by-Step Septic Tank Installation
Now for the main event! Here's how to set up septic tank systems in clear steps:
Step 1: Mark the Installation Area
Mark the tank location Use stakes and string to outline where the tank will go.
Mark the drainfield area Outline the drainfield, keeping it at least 50 feet from water sources as recommended by the World Health Organization.
Call before you dig Contact your utility companies to mark underground lines. This is required by law in most areas!
Step 2: Excavation
Dig the tank hole Excavate a hole about 1 foot deeper and wider than your tank.
Create a level base Add 4-6 inches of sand or gravel and compact it for a solid foundation.
Dig trenches for pipes Create trenches from the house to the tank and from the tank to the drainfield.
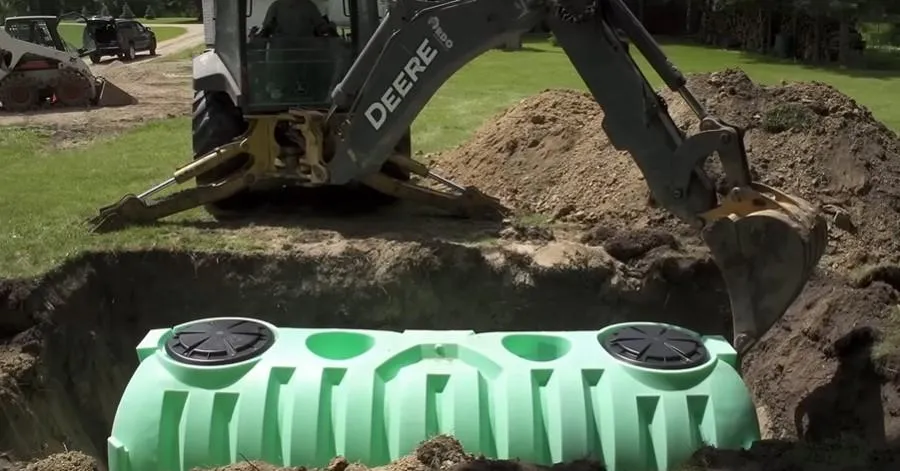
Step 3: Tank Installation
Place the tank Lower the tank into the hole using proper equipment. Never stand under a suspended tank!
Level the tank Check with a level on all sides. The tank must be perfectly level for proper function.
Connect inlet and outlet pipes Attach the pipes from your house and to the distribution box.
Step 4: Drainfield Setup
Lay the distribution box Place it on a level gravel bed.
Connect distribution pipes Run pipes from the distribution box throughout the drainfield area.
Add gravel or chambers Place at least 6 inches of gravel below and 2 inches above the pipes.
Cover with filter fabric This prevents soil from clogging the system.
Step 5: Finishing Up
Backfill carefully Gently fill around the tank and pipes to avoid damage.
Install risers and lids These allow for easy access for future maintenance.
Final grading Slope the soil away from the tank to prevent water pooling.
Common Mistakes to Avoid When Installing a Drain Field
Even with the best septic tank installation guide, issues can arise. Here are the most common problems:
Tank settling Solution: Proper base preparation and compaction
Improper slope Solution: Use a level during every stage of installation
System overload Solution: Install the correct size tank for your home
Clogged drain field Solution: Never drive over the drain field area
The National Association of Home Builders recommends documenting your septic system's location and components for future reference.
Maintenance After Installation
Your work isn't done after installation! For a long-lasting system:
Have your tank inspected every 3 years
Pump your tank every 3-5 years
Conserve water to reduce system strain
Keep records of all maintenance and repairs
Never flush non-biodegradable items
According to the CDC, proper maintenance can extend your system's life by decades!
Conclusion
Setting up a septic tank is a major project that requires careful planning, proper materials, and attention to detail. By following this guide, you'll better understand what goes into a proper installation, even if professionals handle the actual work.
Remember that a well-installed septic system can last 25-30 years with proper care. Your effort now will pay off with decades of trouble-free service!
Do you have questions about how to set up septic tank systems? We recommend consulting with local professionals who understand the specific requirements in your area.

© 2026 | All Rights Reserved | Privacy Policy