
Best Sewer Camera: Your Complete Guide to Video Pipe Inspection
Ever wonder what's really going on inside your pipes? You're not alone. Thousands of homeowners face mysterious clogs, strange smells, and slow drains every day.
Here's the good news: finding the best sewer camera can solve these problems quickly and save you money. We'll show you exactly how to choose the right video pipe inspection camera for your needs.
Why You Need a Sewer Camera
Think about it. When your drain acts up, you usually call a plumber. They charge you $200 just to show up. Then they might tell you they need to dig up your yard to find the problem.
But what if you could see the problem yourself first?
A best sewer pipe inspection camera lets you do exactly that. You can spot clogs, breaks, and other issues without guessing. No more throwing money at problems you can't see.
What Makes the Best Sewer Camera
Not all cameras are the same. Here's what separates the good ones from the great ones:
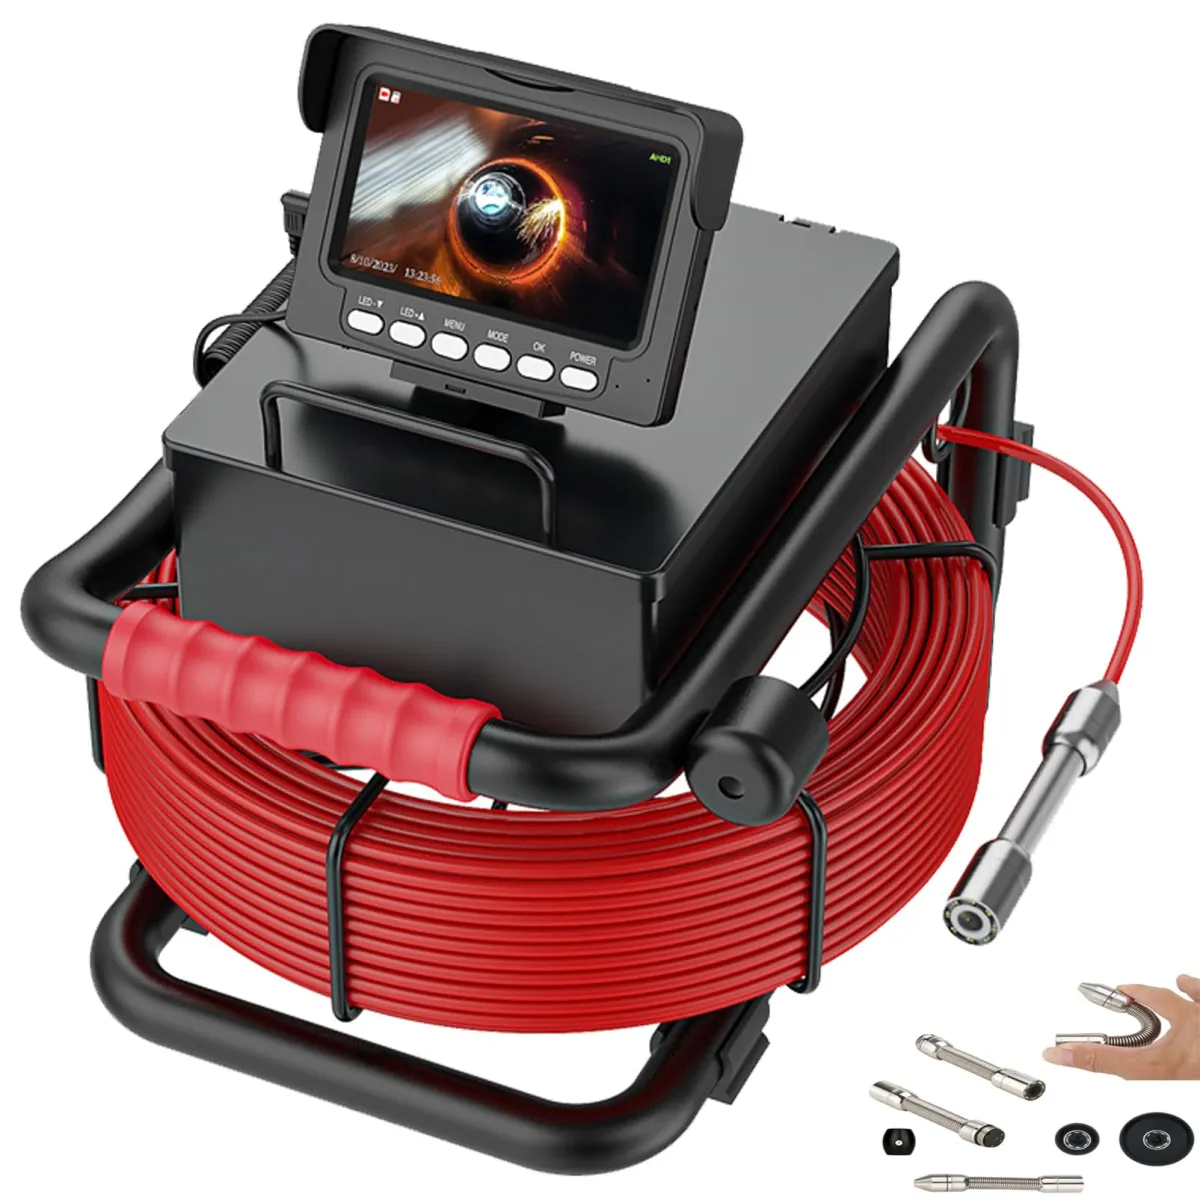
Screen Quality
You need to see clearly what's in your pipes. Look for cameras with:
High-definition screens
Bright, clear images
Good contrast in dark spaces
Cable Length
Most home jobs need 50 to 100 feet of cable. Commercial work might need 200 feet or more. Think about your biggest job before you buy.
Durability
Sewer work is tough. Your camera needs to handle
Water and moisture
Chemicals in pipes
Rough handling
Price Range
Video pipe inspection cameras range from $200 to $5000. Most homeowners do fine with cameras under $1000.
Top Features to Look For
Waterproof Camera Head
This seems obvious, but some cheap cameras aren't fully waterproof. Make sure the camera head can handle full submersion.
LED Lights
Pipes are dark. Really dark. You need bright LED lights built into the camera head. Look for at least 6 LEDs.
Recording Ability
Can you save what you see? The best sewer camera options let you record video or take pictures. This helps when you call professionals later.
Recording Ability
Pipes have turns and bends. Your cable needs to navigate these easily without breaking.
How to Use Your Sewer Camera
Step 1: Prepare Your Workspace
Clear the area around your cleanout or drain opening. You'll need room to work and manage the cable.
Step 2: Insert the Camera
Push the camera head into the pipe slowly. Don't force it. Let the camera do the work.
Step 3: Watch the Screen
Keep your eyes on the monitor. Look for:
Dark spots (possible clogs)
Bright reflections (standing water)
Cracks or breaks in pipe walls
Tree roots growing into pipes
Step 4: Mark Problem Areas
Use the cable length markings to note where problems are. This helps you find issues later.
Step 5: Record Everything
Take pictures or video of problems you find. You'll want this evidence later.
Common Problems You'll Spot
Tree Roots
These show up as stringy, dark masses in your pipes. They're one of the biggest causes of sewer problems.
Grease Buildup
Looks like thick, white or yellow coating on pipe walls. This builds up over years of washing dishes.
Pipe Breaks
You'll see gaps, cracks, or collapsed sections. These need professional repair fast.
Foreign Objects
Toys, jewelry, and other items that fell down drains. Sometimes you can fish these out yourself.
Buying Tips for Your First Camera
Start Simple
Don't buy the fanciest model first. Learn what you need with a basic video pipe inspection camera.
Read Reviews
Check what other users say. Look for comments about durability and image quality.
Consider Renting First
Some hardware stores rent sewer cameras. Try before you buy to see what features matter to you.
Check the Warranty
Good cameras come with at least a one-year warranty. Avoid brands that don't stand behind their products.
Professional vs. DIY Options
When to Go Professional
Call the pros for:
Major pipe repairs
City sewer connections
Commercial buildings
Insurance claims
When DIY Works
Handle these yourself:
Finding simple clogs
Checking new home pipes
Regular maintenance inspections
Small residential jobs
Maintenance Tips
Clean After Each Use
Rinse the camera head and cable with clean water. Dry everything completely before storing.
Store Properly
Keep your camera in a dry place. Coil the cable loosely to prevent kinks.
Check Connections
Look at cable connections regularly. Loose connections cause image problems.
Cost Savings with Your Own Camera
Think about the math. One plumber visit costs $200-500. A good best sewer pipe inspection camera costs $300-800. You break even after just two uses.
Plus, you can:
Help neighbors and make money
Inspect before buying a house
Catch problems early
Avoid emergency plumber fees
Safety First
Wear Gloves
Sewer work is messy. Protect your hands with rubber gloves.
Use Eye Protection
Splashing water and debris can hurt your eyes. Safety glasses are cheap insurance.
Work with a Partner
Don't work alone on big jobs. Having help makes everything easier and safer.
Final Thoughts
Finding the best sewer camera doesn't have to be hard. Start with your needs and budget. Look for good image quality, decent cable length, and solid construction.
Remember, you're not just buying a tool. You're buying peace of mind. No more guessing about pipe problems. No more surprise repair bills.
The right video pipe inspection camera pays for itself quickly. You'll wonder how you managed without one. Take control of your plumbing problems today with the best sewer camera for your situation.

© 2026 | All Rights Reserved | Privacy Policy